Organize my images, presentations, templates, etc. into folders?
See Creating Cycle Menus.
Load an image or animation into the Ronincast system?
Get rid of the black boxing around my image when it displays?
Set the right scaling for my images, movies, and animations?
What image and movie formats are supported in Ronincast?
Images: JPG, JPEG, PNG, GIF, and BMP formats.
Videos: WMV, MPG, MPEG, MOV, QT, SWF, and AVI
Move the background image so that it displays behind my other items?
The background image has to be in a catalog item to display behind your other items. You cannot use the Image widget to place a background image in the presentation. It will display on top of everything.
To display a background image in the back:
1. In the Layout tab, create a new layout with the dimensions of the area it will populate. It may be the same as the template zone.
2. Click the zone and assign it the "IconImage" Type in the Properties section. Leave the Group as "Default Group."
3. Give it a meaningful name so it is obvious it is a background layout.
4. In the Catalogs tab, create a Catalog Item using the steps in Create New Catalog Item.
5. For adding the background image in the Catalog Item, select "IconImage" from the Item Type drop-down list.
6. Click the Add button. The list of images will display.
7. Select the background image and click Save.
8. In the Presentations tab, drag the Custom Layout Widget to the background zone. The Layout Widget Configuration page will display.
9. In the Select Layout tab, select the background layout that was just created.
NOTE: On the top right of the Layout Widget Configuration page, the Choose Catalog Item for drop-down will already have "Default Group" selected.
10. Select the background image catalog item from the list of Catalog Items. The layout in the Preview Layout tab will populate with the background image.
11. Click Save.
12. Click Save in the presentation.
If I am a food manager, how do I update prices on my menu?
Know what Item Types to use when creating a Catalog Item?
To determine what the correct Item Types should be:
1. Open the presentation in Presentation Management.
2. Click on the zone where the Catalog Items are not appearing.
3. Click the Change Content button below the presentation. The Layout Widget Configuration page with the Preview Layout tab displayed.
4. Hover the cursor over each zone in the layout on the left side of Configuration window. The tool tip will display the name of the Catalog Item and the name of the Layout Groups, i.e., "Header; Group: header and body."
5. Edit the incorrect Catalog Item and assign the correct Item Types. See Editing a Catalog Item for more information.
A catalog item is a group of an image and various unformatted text items (price, menu name, etc.) that will be associated directly with a layout group. Catalog items are made up of catalog item details.
Catalog Item Details: Pieces of data that make up the catalog item. The catalog item could be made up of images or text (headers, menu names, prices, etc.), e.g., Catalog Group A = Image of sandwich, “Beef Eater Sandwich” Header, a description of the sandwich as text, and a price of "$3.99."
To adjust the size of the font:
1. Click the zone in the presentation needing adjustment.
2. Click the Change Content button below the presentation. The Layout Widget Configuration page displays.
3. In the Preview Layout tab, click the zone with the font needing adjustment. The Theme Properties display below the layout.
4. In the properties, note the size and name of the font being used.
5. Click Change Theme.
6. Find a theme in the list with the same or similar font with a smaller font size and select.
NOTE: If such a theme does not exist, it will have to be created using these steps: Create New Theme
7. Preview the new font size in the Preview Layout tab and if acceptable, click Save.
Set my Catalog Items so that they will display in the layout when I assemble my presentation?
To determine what the correct Item Types should be:
1. Open the presentation in Presentation Management.
2. Click on the zone where the Catalog Items are not appearing.
3. Click the Change Content button below the presentation. The Layout Widget Configuration page with the Preview Layout tab displayed.
4. Hover the cursor over each zone in the layout on the left side of Configuration window. The tool tip will display the name of the Catalog Item and the name of the Layout Groups, i.e., "Header; Group: header and body."
5. Create the Catalog Items using the correct Item Types. See Create New Catalog Item for more information.
Rotate a playlist of text items in a zone?
Populate my board with a custom layout?
Find out the name of the template I am currently using for my presentation?
In the Presentation Management page, open the presentation in question.
Look below the box with all of the Widgets on the right side and you will see Duration, Usage, and then Template. The name of the template being used is stated there.
Find out which layout is being used in a given zone in my presentation?
1. Select the zone in the presentation.
2. Below the presentation, select Change Content. The Preview Layout tab in the Layout Widget Configuration window appears.
3. Click the Select Layout tab on the left side of the Configuration window.
4. Locate the layout in the list that has the radio button selected.
5. Populate layout using the steps in: Adding Custom Layouts to a Presentation Zone.
Select a different layout for a zone in my presentation?
1. Select the zone in the presentation.
2. Below the presentation, select Change Content. The Preview Layout tab in the Layout Widget Configuration window appears.
3. Click the Select Layout tab on the left side of the Configuration window.
4. Select a different layout from the list.
5. Populate layout using the steps in: Adding Custom Layouts to a Presentation Zone.
Enable the Width and Height settings in both the Layout Editor and Template Editor?
Click the words "Width" and "Height" and the drop-down lists will become enabled.
Add more lines of content to a section of my menuboard, greeter board, or promo board?
If you have the rights to edit templates and layouts in your organization, do the following:
1. Open the presentation you wish to edit.
2. Note the name of the template by locating it beneath the widgets and Duration field.
3. Click the zone in the template for which you wish to add more lines. Note the name of the Layout located right beneath the presentation.
1. Click the Templates tab and click Edit next to the template you wish to edit.
IMPORTANT: If the presentation you are editing is currently playing on a screen, your changes will appear in incomplete stages on the screen. It is recommended to make these changes during off hours for that station.
2. Adjust the size of the zone you wish to add more content to either manually or in the Zone Properties.
NOTE: You cannot add or delete zones from a template currently in use.
3. For more information on creating or editing templates, see Editing an Existing Template.
4. After edits are complete. click the Save icon.
5. Before closing the template, click the zone or zones altered and note down the new dimensions of the zones located in the Zone Properties.
1. Click the Layouts tab and click Edit next to the layout you wish to edit.
2. Click the blue Width and Height links to enable the Layout Properties.
3. Enter the dimensions of the zone you just edited. Once you enter the first value and click out of the box, a window will appear asking you if you want to scale the existing layout item details (blue boxes) or if you want to maintain current positioning.
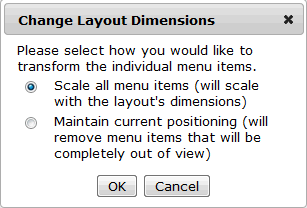
4. Most of the time you will want to select the second option to avoid affecting all of the layout item details.
5. After entering the new dimensions, move any existing layout item details (blue boxes) that need adjusting to accommodate the new content. This is optional.
6. To add new rows of blue boxes to accommodate additional content, follow the steps outlined in Creating a New Layout. However you will need to ensure that all of the following steps are completed before the new content can appear:
a. Add new layout item details.
b. According to how the existing layout item details were set, assign an Item Type to each layout item detail. See Setting Item Types for more information. These should be consistent with the rows already in place. Note these Item Types for creating new Catalog Items.
c. Create a new Layout Group for each set of content items. For example, if your new row has a menu item, a price, and a description, you would create one Layout Group for the whole set. See Using Layout Groups for more information on what Layout Groups are and how to create them.
NOTE: Keep the naming conventions short and consistent with existing Layout Groups.
d. Apply the Layout Group to each new layout item detail using the Group dropdown arrow located in the Layout Item Detail Properties.
e. Apply themes to the new layout item details by clicking on the Apply Theme icon in the lower left of the window. See Applying Themes to the Layout for more information.
7. Click the Save icon in the Layout page.
Before the new content can appear on your boards, you will need to create catalog items with the new content.
1. Click the Catalogs tab and click Create New Catalog Item.
2. Create a catalog item per layout group added to the layout.
Set up a schedule for a whole week?
1. Click the Contents/Schedules tab.
2. Click Create New Schedule.
3. Click the Week button for the Week View.
4. Add the Monday presentation to Monday on the timeline using the steps in: Creating a New Schedule
5. If you want this Monday presentation to play every Monday, set the recurrence at Weeks, then "1". Keep "Forever" selected unless you know the end date.
6. Set the Priority at a "4".
7. Click Add To Schedule.
8. Continue adding the daily presentations to the other days of the week, Tuesday, Wednesday, etc. using the same settings as Monday.
9. Click Save in the Schedule page.
Display a presentation on my monitor?
Know the status of my player and display?
Add an emergency message to the current schedule being played on the display?
Create the message in the Presentations tab. If a template and layout do not exist for a one-zone presentation, follow these steps for creating them: Creating a New Template and Creating a New Layout
Create the message itself in a new Catalog Item using these steps: Create New Catalog Item
NOTE: Be sure the Item Type in the Catalog Item matches the Item Type assigned in the Layout.
Create a message in Microsoft PowerPoint and Save As an image (using .jpg, .png, or .gif format).
Create a template with one zone using these steps: Creating a New Template
Create a new presentation using the one zone template.
Assemble the presentation either using the Image Widget or the Playlist Widget using these steps: Adding an Image to a Presentation Zone or Adding a Playlist to a Presentation Zone
In this help system, click the Task Assistants & Hands-on Exercises link in the Contents.
Locate the "Create a Holiday Schedule" Task Assistant and select.
These steps will explain how to add a special presentation that would supercede your regular schedule.
© 2013 WIRELESS RONIN TECHNOLOGIES, INC.